Have you ever had that feeling that the world around you is spinning waaaay to fast - and you are just too tired to keep up? Well, that is how I have been feeling this past week. I have an exam coming up on Tuesday - and I have been studying like crazy, as well as trying to keep the rest of my life on track. And in all of this I had NO time to finish a post for you guys. Just when I was despairing, one of my sweetest friends sent me A WONDERFUL surprise! Carla (who you will know well if you follow my blog!!!) has done a WONDERFUL post, with stunning photos. Carla - you no idea how much this means to me! I hope that you guys enjoy this as much as I did!!!!
Hi! I am Carla and I blog over at Carla’s Confections. I am so excited to be sharing this recipe here at Bits of Sunshine. If you don’t know, Heidi and I have been blogging friends now for a little while. We met on Instagram (note from Heidi here: you guys MUST check out Carlas Instagram - its awesome!) around 6 months ago and we really hit it off! Goes to show what technology can do for us these days. You can make friends even when you aren’t from or living in the same country.
Heidi asked me to guest post for her a little while back and it took me a while to come up with exactly what I wanted to do. I wanted it to be perfect, since the last guest post she did for me was such a big hit.
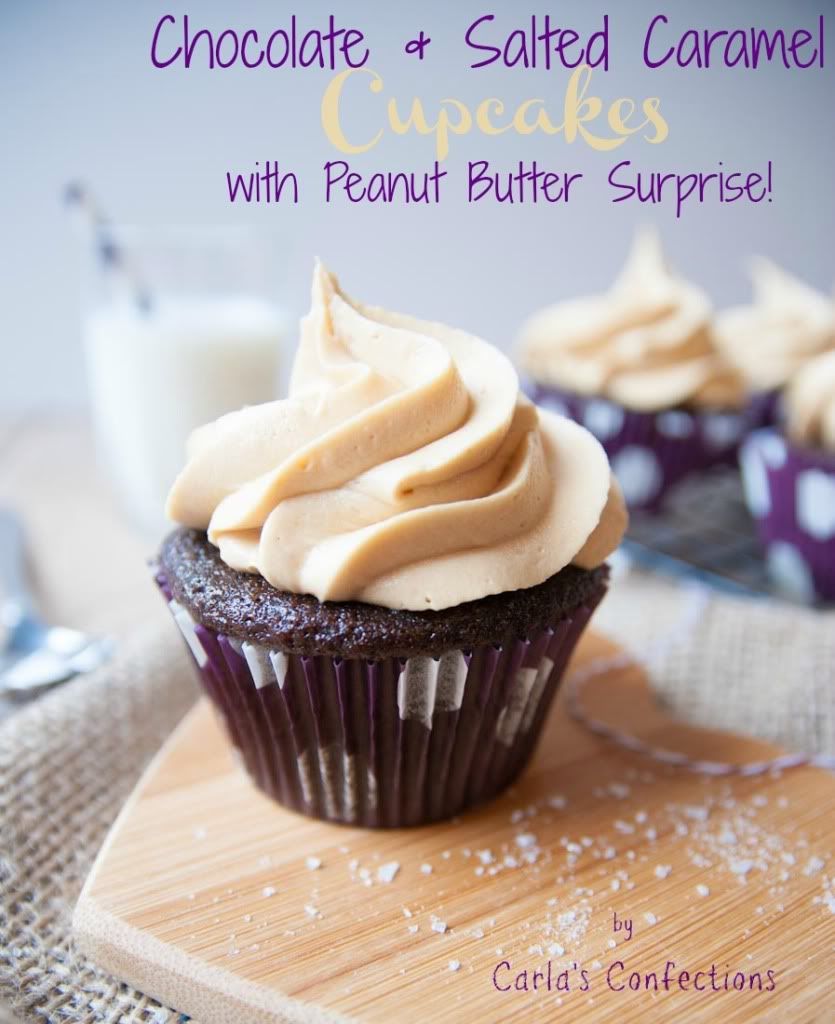
One of the most popular recipes on my blog (other than Heidi’s guest post for me) are my Vanilla & Salted Caramel Cupcakes with a Peanut Butter Surprise.Since I made those, I have been wanting to do a chocolate version, because – well – who doesn’t love chocolate right?? I figured it would be the perfect thing to make for Heidi’s blog, and I can only hope that it is as big of a hit as her cupcakes have been on my blog!
These cupcakes were so much better than the vanilla version too! Something about chocolate and salted caramel just screams heaven. And then to add the peanut butter on the inside. Mmmmm is all I have to say about it! You need to try it soon. I promise you won’t be disappointed.
I only made a half batch of these, and I really wish I would have stuck to the original size of the recipe, because they were gone the next day! They were such a big hit guys!! You will make new friends and never get rid of the existing ones if you share these, so don’t hand them out to people you don’t like (haha just kidding… I think). But really, you will become popular among your friends if you make these. Because, you know, popularity is what it is all about anyway. ;)

Don’t you just love the little heart cutting board??? Heidi gave it to me! She bought it off of amazon.com and had it shipped to me! She is the sweetest thing on earth! You really should become friends with her. She is the best and kindest person on earth!! Once I received that in the mail, I knew it was going in the pictures with these cupcakes. I am in love with that cute little board!
Let’s get to making these cupcakes!

(another note from Heidi :) - aren't those liners JUST ADORABLE!!!!)
Line your muffin pan with cupcake liners. I like to double mine up unless I have really good quality liners, that way the liner is still really vibrant when the cupcakes are done. But you can do it however you like. Also, take about a cup (heaping) of peanut butter and place it in the freezer for about 30 minutes to harden slightly. This will make it easier to place into the cupcakes without making a huge peanut buttery mess.

I didn’t take pictures of the process of making the batter, but it is really simple. In one bowl, combine the dry ingredients, which are flour, baking soda and powder, cocoa powder, sugar and salt. In a second bowl, combine vegetable oil, buttermilk, vanilla and an egg. Slowly stir the wet mixture into the dry mixture and then finish off by stirring in some hot freshly brewed coffee. That’s it for the batter. Very simple :)

Using a large cookie scoop, fill the cupcakes about 1/3 of the way full, then using a spoon, scoop a small bit of peanut butter and place it into the cupcake liner. The cake batter is really liquidy and the peanut butter is heavy, so it will most likely sink to the bottom while baking. But this is really perfect. Just what you want to get the surprise factor!

Cover the peanut butter with more batter, but don’t fill the liner more than ¾ way full. Remember how I said the peanut butter will sink to the bottom? It’s ok if there is some peanut butter peeking through, because it will sink and be covered in the end. Don’t overfill the liners. This particular batter, when baked will end up with a nice flat top, which is just what you want for cupcakes. It makes a perfect surface for beautiful frosting.

Here is what they look like once baked. You’ll know they are ready when you stick a skewer in and it comes out clean (surprisingly, they still come out clean with the peanut butter in it – as long as it is fully cooked). You can see how flat these cook, and no peanut butter showing through! Perfect!!
Now I have a confession to make. I completely forgot to take process pictures of my salted caramel frosting!!! Ooops… But no fear! I have made it before and I took pictures that time to make the process easier for you. Just head over to my Salted Caramel Frosting post to see those pictures.
I promise though that making caramel is not as scary as it seems. Just take a chance and try it out. You won’t be disappointed and these cupcakes are going to be a huge hit. I promise that!

Once the cupcakes are cooled completely, you can frost to your heart’s desire! I used the M1 tip from Wilton, but feel free to decorate however you like. You may also choose to sprinkle extra sea salt on top, but I left that out because I thought there was enough of a salty flavor to it.

(Yip - its me again! *MELT* how good does this look...)
The best part! Peanut Butter Surprise!!! Peanut butter and chocolate are such complimentary flavors and the three flavors just go together so well! You cannot miss out on these, and I’m telling you, they will be gone in the blink of an eye! And they are also really easy to make. Don’t be scared of making caramel and the caramel won’t be scared of you. It only bites if you provoke it you know ;)
I will leave you with that final thought and the recipe of course! Thank you Heidi for letting me guest post for you again and thank you to all the readers for listening to my rambling and crazy jokes.
Chocolate & Salted Caramel Cupcakes with Peanut Butter Surprise | Printable Recipe
makes about 16 cupcakes
ingredients:
for the cake:
- ½ cup + 6 Tbsp. all-purpose flour
- 1 cup granulated sugar
- 6 Tbsp. cocoa powder
- ½ tsp. salt
- ½ tsp. baking powder
- 1 tsp. baking soda
- ½ cup buttermilk (you can make yourself by combining ½ cup milk with ½ Tbsp. lemon juice or vinegar and let sit for 5-10 minutes)
- ¼ cup vegetable oil
- 1 large egg
- ½ tsp. vanilla extract
- ½ cup freshly brewed hot coffee
- 1 heaping cup peanut butter
for the frosting:
- ¼ cup granulated sugar
- 2 Tbsp. water
- ¼ cup heavy whipping cream (or cream)
- 1 ½ sticks (¾ cup) salted butter, softened
- 1/8 tsp. sea salt
- 1 tsp. vanilla extract
- 2 cups powdered sugar
directions:
- Place the peanut butter in the freezer for 30 minutes to get cold and harden.
- Preheat the oven to 350F/180C and line a muffin tin with cupcake liners (I like to double my liners).
- To make the cake batter, get out two separate bowls and a measuring cup for the hot brewed coffee. In one bowl, combine all of the dry ingredients using a whisk.
- In the second bowl combine all of the wet ingredients (including the egg) and excluding the coffee. Put the coffee in the measuring cup and set aside. Combine all of the wet ingredients (other than the coffee) using a whisk, and then stir the wet mixture into the dry mixture, little bits at a time. Once fully combined, stir in the coffee until well combined.
- Fill cupcake liners 1/3 full, then using a spoon, scoop in a teaspoon sized ball of peanut butter into the cupcake liner with the batter. Fill the cupcake liner with more cake batter, until it is no more than ¾ full. It is ok if there is peanut butter peeking through. It will sink to the bottom while baking.
- Bake in the preheated oven for 20-25 minutes or until a skewer inserted in the middle comes out clean. Allow to cool completely while you make the frosting.
- For the caramel: add the water and sugar into a small saucepan over medium to medium-high heat. Stir the sugar and water to help dissolve. Bring mixture to a boil and stop stirring. Allow mixture to boil, uncovered for about 5-7 minutes, until it turns deep amber brown in color. Don’t stir, and don’t touch caramel. This could cause a bad burn. Immediately remove from heat and stir in the cream. Be careful of steam. Let sit and cool about 20-30 minutes.
- Cream the softened butter and salt in a stand mixer until fluffy, and then add the vanilla. Add the powdered sugar in batches with the mixer turned to low speed, until fully combined. Add in the cooled caramel until fully combined.
- Frost your cupcakes using a piping bag and with whatever chosen nozzle (I used 1M).
- Enjoy within a few days (if they last that long)
Cake recipe adapted from I am Baker & Frosting adapted from CHOW
Ok - it's me AGAIN - just wanted to end of saying ,with tears of joy and gratefulness, THANK YOU CARLA! You really are the best! I am so pleased that I have you as my friend! You were there when I really needed you, and I didn't even have to ask, you just were! We may be more than 17000 km away from each other - but you are a REAL friend!!!! xxxxx